Showing posts with label dessert. Show all posts

Wednesday, April 8, 2015

Sourdough Sticky Buns

The kids and I were watching an old episode of a food network show about sticky buns. I was drooling the whole time. All the kids were fascinated and wanted to know if we could make sticky buns someday. Well, all the kids except for the 2-year-old. He just thought that "sticky buns" was a really silly word, and giggled and repeated it every time someone on the show said it.


I had my sourdough starter all active and bubbly, having just used it that morning to make pancakes. I figured that I would treat the family to a batch of delicious sourdough sticky buns.

I used my new favorite recipe for sourdough bread, because it makes bread that is very soft and not too sour. I combined a couple recipes for the sticky, gooey glaze, and came up with these fantastic sticky buns. Best served warm, so the glaze is caramel-soft.


I didn't make these buns super duper sticky. The caramel topping can be doubled if you want the kind of sticky buns with oozing caramel that drips down your fingers. But any mess the kids made while eating these is a mess I would have to clean up! So I stuck with a smaller amount of topping, one that would leave a minimal amount of sticky on the fingers, face, table, floor, and clothing.


Sourdough Sticky Buns
1/2 batch Velvety-Soft Sourdough Bread dough
3 tbsp. softened butter
1/3 cup sugar
3 tbsp. cinnamon
Caramel Topping:
1 cup packed brown sugar
4 tsp. honey
4 tbsp. melted butter
1 tsp. vanilla
1/2 cup chopped nuts (pecans are traditional, I used almonds)

Prepare bread dough (mix sponge, rise, add flour to make dough, rise twice). I start the sponge early in the evening the previous day, then mix it into dough and set it to rise right before I go to bed. When I get up I punch it down and let it rise again, then punch it down again and it's ready to shape.

Roll out dough into large rectangle. Smear the 3 tbsp. softened butter over the rectangle of dough. Combine sugar and cinnamon and sprinkle over the butter. Roll, starting with long side. Cut into 12 segments. Cover while you make the topping.

In a bowl, combine brown sugar, honey, 4 tbsp. melted butter, and vanilla. Spread into greased 9x13 pan, then top with chopped nuts. Arrange buns on top of caramel topping and nuts. Cover and let rise until double.

Preheat oven to 400 degrees. Bake buns 20-22 minutes. Let sit in pan for about a minute. Invert onto another pan, or serving platter. Let the caramel drip over the buns a bit before removing the baking pan. Scrape any leftover topping out of the pan and spread over top of sticky buns.


I set aside a couple of these to give my husband when he gets home from work. It's taking all of my self-control and all of my love for my husband not to go in and eat them right now. I. Must. Be. Strong...

Linking to:
"Think Tank Thursday" 
Link Party Palooza

Saturday, March 7, 2015

Sourdough Pudding


I was recently browsing for new recipes to use my sourdough starter. It's a fun pastime, I highly recommend it. I searched for "sourdough pudding," thinking that sourdough starter might make for an interesting custard, if used in place of cornstarch or flour as a thickening agent.

I found recipe after recipe for sourdough bread pudding, and a few random recipes that had nothing to do with either sourdough or pudding. But no recipes for a custard pudding made with sourdough. I tried different wordings, different search engines, but nowhere could I find a recipe that made a simple custard pudding using sourdough starter.

I couldn't let it go. I had to try it, to see if it would work. I was nervous and excited. I was about to attempt to do something that, according to the internet, had NEVER BEEN DONE BEFORE. Because obviously, if it had ever been done before, it would be somewhere on the internet. Amiright?

Well, now it has been done, and now it is on the interwebs. I have successfully made a custard-style pudding, using sourdough starter in place of flour, cornstarch, and part of the milk. And it totally worked.


The flavor is what I would expect, having tried a number of dessert recipes that use sourdough starter. It's sweet and pudding-like, and it has that bit of tang and richness that sourdough usually gives. I will say that the distinct flavor that sourdough gives is very distinct in this recipe. There aren't any other flavors to compete with it, so it's quite strong. So if you don't like the flavor of sourdough starter, this probably isn't the pudding for you. But if you like sourdough in just about anything, you'll like it in this.

In the interest of being fully honest, at one point I thought I would have to scrap the whole thing, pour it out into cheesecloth, and claim that my intention all along had been to create a sweet sourdough cheese (details in the recipe below). Even now, I'm throwing around the idea of making cheese with sourdough, because I found out today that it would totally work. But I held out and it turned into pudding after all.


Sourdough Vanilla Pudding
2/3 cup sugar
Dash of salt
1/2 cup sourdough starter
2 2/3 cup milk
2 eggs, beaten
1 1/2 tsp. vanilla
1 tbsp. butter or margarine

Combine sugar and salt in large saucepan. Mix together sourdough starter and milk, and add gradually to the sugar, stirring to combine.

Cook over moderate heat, stirring constantly. At some point, the milk will curdle. Sourdough starter is acidic, which I halfway forgot when I was planning out this recipe. The mixture will look like you're making cheese, with chunky curds and watery whey. Just keep stirring. Don't use a whisk at this point, though, or you'll end up with a very large, gloppy, stretchy blob of curds stuck to the whisk. Just use a spoon.

Continue heating and stirring until the curds dissolve back into the whey. At this point you can use a whisk so the mixture gets smooth. Once it comes to a boil, boil for 1 minute, stirring constantly. Remove from heat.

Slowly stir half of the mixture into the beaten eggs. Blend egg mixture into hot mixture in saucepan. Return to a boil, and boil for 1 minute, stirring constantly. Remove from heat. Blend in vanilla and butter.

Pour pudding into serving dish(es). Cover with plastic wrap and chill thoroughly (about 2 hours) before serving.


I'm pretty sure this could be used in place of vanilla pudding in any recipe. I want to try it in a pie crust. You could add bananas and make sourdough banana cream pie. Add coconut and make sourdough coconut cream pie. Stir in a cup of chocolate chips with the vanilla and butter and make sourdough chocolate pudding or sourdough chocolate cream pie. Layer this stuff with bananas and nilla wafers to make sourdough banana pudding. The possibilities are endless!

Linking:
Think Tank Thursday

Monday, March 2, 2015

Amazing Sourdough Brownies


These sourdough brownies are absolutely amazing. The chocolate flavor is intense, more so than any brownie I've ever tried. The texture of the brownies is dense, smooth, and fudgy. The sourdough adds a touch of tang, but its most noticeable contributions are richness and intensity. The overall combination of flavor and texture makes these brownies divine. I would go on and on, but basically no words can really describe how amazing these brownies are, so you should just make them. If you don't have sourdough starter, make some, then make these brownies.

Don't you want to dive in head first?

I made a batch a few weeks ago, and have been dreaming about them pretty much nonstop ever since. My mouth waters just thinking about these incredible bars of chocolate perfection.


This recipe gives ingredient amounts by weight instead of volume. I have a nice little digital kitchen scale that I use, I just zero it out after adding each ingredient. I prefer volume recipes, but I'm willing to make adjustments for a recipe this delicious.

Sourdough Brownies
(source Chef in Disguise)
300 grams chocolate, chopped (I used chocolate chips for one batch, and a *substitute made with cocoa powder, sugar, and oil the second time, both worked great)
226 grams (2 sticks) unsalted butter
200 grams sugar
6 grams (1 tsp.) salt
8.4 grams (2 tsp.) vanilla
3 eggs, room temperature
40 grams cocoa powder
220 grams sourdough starter

Preheat oven to 325 F.

Line a metal 9×13 pan with parchment paper and grease it ( it makes it easier  to lift the brownies out of the pan if you leave some extra parchment at the 13 inch sides).

In a double broiler, saucepan, or the microwave, melt the chocolate and butter. Stir it often so it does not burn.

Pour the melted chocolate/butter into a large bowl. Whisk in the sugar, salt and vanilla.

Add the eggs one at a time, whisking to combine each addition. Sift the cocoa powder over the chocolate and stir to combine. Add the starter and stir gently until it is completely incorporated.

Turn the batter into the prepared pan and bake for about 40 minutes, or until a toothpick inserted into the center comes out clean.

Cool in the pan 20 minutes then lift the parchment paper out and allow to cool the rest of the way on a wire rack. When cool completely, cut into squares and enjoy!


*To make chocolate substitute: For one ounce of semisweet/bittersweet chocolate, whisk together 1 tbsp. cocoa powder, 3 1/2 tsp. sugar, and 2 tsp. oil or softened butter or margarine.

300 grams of chocolate converts to about 10.5 ounces. So for this recipe I used 10 1/2 tbsp. cocoa powder, 12 tbsp. plus 1 tsp. sugar, and 7 tbsp. oil. I then added this mixture to the melted unsalted butter and continued with the recipe from there.

Complicated enough? I know, I know. But I WANTED these brownies and I was out of chocolate. I did what I had to do.

Le Swoon!

Linking to:
Think Tank Thursday 
Link Party Palooza

Tuesday, February 10, 2015

Sourdough Chocolate Cake

I've been seriously enjoying my sourdough starter lately. You can just do so much with sourdough! I keep trying to find new recipes to try, because the starter needs to be drained and fed every few days. I simply refuse to throw away the starter that I drain off, so I just have to make fun and delicious foods with it instead. Oh so difficult. ;)

My latest sourdough adventure was this delicious chocolate cake. The batter was fun - it looked just like instant chocolate pudding, and tasted similar to pudding too. Yes, I tasted the batter. I licked the beaters, the spatula, the bowl. It was fantastic. I regret nothing.


I topped the cake with a basic cream cheese frosting, and it complimented the cake well. Both the cake and the frosting were sweet with a little bit of a tang, and it was a great combination.

Sourdough Chocolate Cake
(from allrecipes.com)
1 3/4 cups all-purpose flour
2/3 cup unsweetened cocoa
3/4 tsp. baking soda
1/2 tsp. baking powder
1 tsp. salt
2/3 cup shortening
1 2/3 cup white sugar
3 eggs
1 cup sourdough starter (recipe here)
3/4 cup cold water
1 tsp. vanilla extract

Preheat oven to 350 degrees. Grease 9x13 baking pan.

Sift together flour, cocoa, soda, baking powder, and salt.

Cream shortening, sugar, and eggs. Blend in sourdough starter. Add sifted ingredients slowly to creamed mixture, beating until smooth. Stir in water and vanilla, and mix well.

 Pour batter into greased and floured 9 x 13 inch pan.

 Bake for 35 minutes, or until done.

Cool completely before frosting.


Cream Cheese Frosting
 8 oz. cream cheese, softened
1/4 cup butter or margarine, softened
1 tsp. vanilla extract
4 cups powdered sugar

In a stand mixer or with a hand mixer, cream together cream cheese, butter, and vanilla. Slowly add powdered sugar, mixing until smooth and creamy.

I left the cake in the pan and only frosted the top. That way I only used about two-thirds of the frosting, and could keep the leftover frosting in the fridge. Because, let's face it, there are certainly worse things than having a cup or two of cream cheese frosting sitting around waiting to be used. So convenient for delicious snacking...

Linking:
Think Tank Thursday

Friday, August 15, 2014

Dutch Oven Snickerdoodle Bars

We recently had our bi-annual family reunion. At these reunions, there is always a big auction, where everyone contributes items to sell and the proceeds go toward funding the next reunion. It's kind of a big deal in our family. I posted about this a few years ago here.

Anyway, Jeff and I had a lot of fun at this year's auction, and got all sorts of neat stuff. Our biggest purchase was a dutch oven. It's a 12-inch, 8-quart dutch oven that has obviously been properly cared for and beautifully seasoned. The thing is, I've never cooked anything in a dutch oven. So I've been reading everything online that I can find about how to cook with and care for dutch ovens, and I was finally ready today to give it a try!


This recipe came from a great blog for anyone interested in using a dutch oven. Toni decided that she wanted to try something new, so she committed to cooking in her dutch oven(s) every day for an entire year! Wow! Her first month or two of recipes include helpful tips of things that she was learning along the way, and she has a few other resources scattered throughout that were helpful and encouraging. Plus she graded almost every recipe so you know what was really good and what wasn't good at all. Most of the recipes rated either a B or an A. These cookie bars received an A.


Dutch Oven Snickerdoodle Bars
(from Dutch Oven Madness)
12" dutch oven
2 1/3 cup flour
1 1/4 tsp. baking powder
1/2 tsp. salt
3/4 cup butter, softened
1 1/4 cup sugar
1/2 cup brown sugar
3 eggs
1 tsp. vanilla
Cinnamon Filling:
1 tbsp. sugar
1 tbsp. cinnamon
Glaze:
1/2 cup powdered sugar
1/4 tsp. vanilla
1/2 tbsp. milk

In a small bowl combine the flour, baking powder, and salt. In a large bowl beat the butter until creamy. Beat in the sugars until fully incorporated. Then beat in the eggs, one at a time, until fully incorporated. Add vanilla. Slowly mix in the dry ingredients.

Spread half of the batter on the bottom of a greased 12" dutch oven. Mix together the cinnamon filling ingredients and sprinkle evenly over the batter in the pan. Dollop the remaining batter in teaspoonfuls over the cinnamon filling. Don't worry about it not completely covering the filling - everything will spread out in the oven and have a great marbled look.

Bake at 350 for 20-25 minutes or until a toothpick inserted in the middle comes out clean. Let cool completely, then mix together the glaze ingredients (adding more milk if it's too thick, or more sugar if it's too thin) and drizzle over the top of the bars.

There are different ways to get the dutch oven to the temperature you want. One popular method is coal counting - for a 12" oven to cook at 350 you would want 16 coals on top and 10 on the bottom. But this doesn't take into account the size of the coals - some are bigger than others. Toni at Dutch Oven Madness prefers the Dinwiddie Ring method, because it allows you to accurately cook with any size coals and makes it so you don't have to count. I chose to use this method and it was easy to figure out, and the bars baked up beautifully.

Dinnwiddie ring method - one ring of coals on the bottom, one and a half rings on top to achieve approximately 350 degrees.


Actually, my cookie bars were slightly undercooked, but that's because I jumped the gun and didn't actually test them for doneness with a toothpick. They could have used a few more minutes, but even underdone, they tasted incredible, and I'm so excited to try more recipes! I don't think I'll be cooking in the dutch oven every single day, but I can say for certain that my new toy will not be put away in a closet only to be brought out for camping. It's too easy and too fun to only be used once or twice a year!


Linking to:
Link Party Palooza
Strut Your Stuff Saturday
Think Tank Thursday

Monday, July 28, 2014

Chocolate Berry Truffle Cheesecake


When I was a teenager, my dad decided he wanted to learn how to make gourmet cheesecakes. He bought a recipe book featuring a large variety of cheesecakes, and started baking. These cheesecakes were a big departure from the no-bake Jell-O cheesecakes of my childhood. There was a year or two when we were almost constantly trying new fancy cheesecake recipes, everything from Chocolate Turtle Cheesecake to No-Bake Peanut Butter Cheesecake to Banana Split Cheesecake. Mmm. Those were good times.

The very first cheesecake that Dad made out of that beautiful little book was called Chocolate Raspberry Truffle Cheesecake. It was a 10-inch cheesecake that used 2 full pounds of cream cheese, a lot of chocolate chips, and seedless raspberry preserves. He took the sides off the springform pan too soon, so it ended up being a giant shapeless blob in the refrigerator. But it was the richest, most decadently delicious shapeless blog any of us had ever experienced. It was amazing.


After that first cheesecake, Dad's skills improved and we had no more shapeless blobs occupying the place of honor on the fridge shelf. With each cheesecake, he (and those of us kids who watched or helped) learned about ways to keep the cheesecake from cracking, how to mix it properly to reduce lumps, how to bake it and cool it just right. For instance, scrape the sides of the bowl very frequently while mixing, especially after adding a new ingredient. The cheesecake is done baking when the middle half is still relatively jiggly - if it doesn't still jiggle it's overdone. Make sure to let the cheesecake cool completely (and slowly) before removing the springform pan sides. If your cheesecake cracks it's perfectly acceptable to top it with whipped cream or sweetened sour cream to hide the cracks! But still, no matter how many successful and beautiful masterpieces Dad turned out, that first sloppy pile of cheesecake-y goodness has always been my favorite.

The recipe calls for seedless raspberry preserves. But I can't always find those, I don't know why. So I'll sometimes use a different type of berry preserves, with great results. This time I used seedless blackberry preserves. I'll compromise on the type of berry the preserves are made of, but I won't compromise on the fact that they have to be seedless. To get the smooth, perfect texture in the chocolate truffles, you need to use preserves that don't have seeds or chunks.


Chocolate Berry Truffle Cheesecake
Crust:
1 1/2 cups finely crushed cream-filled chocolate sandwich cookie crumbs
2 tablespoons margarine, melted
Filling:
1 1/2 pounds cream cheese, softened
1 1/4 cups sugar
3 eggs
1 cup sour cream
1 teaspoon vanilla
Truffles:
8 ounces cream cheese, softened
9 ounces semi-sweet chocolate, melted
1/2 cup seedless raspberry preserves
Topping:
6 ounces semi-sweet chocolate
1/3 cup heavy cream

1. To make crust, combine cookie crumbs and margarine and press into the bottom of a 10-inch springform pan. Set aside.
2. Preheat oven to 325 degrees.
3. To make filling, with an electric mixer set on medium speed combine 1 1/2 pounds cream cheese and sugar until well blended (scrape sides of bowl frequently throughout steps 3-7 to prevent lumps).
4. Add eggs, one at a time, mixing well after each addition.
5. Blend in sour cream and vanilla and then pour into prepared crust. Set aside.
6. Combine 8 ounces cream cheese and melted chocolate, mixing at medium speed until well blended.
7. Add raspberry preserves, mixing together well.
8. Drop chocolate raspberry batter by tablespoonfuls onto plain cream cheese batter in pan (I used my 2-tbsp. cookie scoop). Do not swirl.
9. Bake for 1 hour and 25 minutes.
10. Remove from oven, loosen cake from sides of pan, and let cool on a wire rack for 1 to 2 hours before removing from pan (I actually leave it in the pan until ready to serve).
11. To make topping, cook chocolate and heavy cream over low heat, stirring constantly, until chocolate has melted and mixture is smooth.
12. Remove from heat and spread over cooled cheesecake.
13. Chill for 4 to 6 hours.

After dolloping on the chocolate truffle mixture and placing in the oven.

Immediately after removing from the oven. The cheesecake sinks quite a bit while cooling, that's normal. I baked the cheesecake last night, forgive my use of the camera flash!

After cooling, the cheesecake is at least half an inch shorter than it was before.

Freshly covered in chocolate ganache.


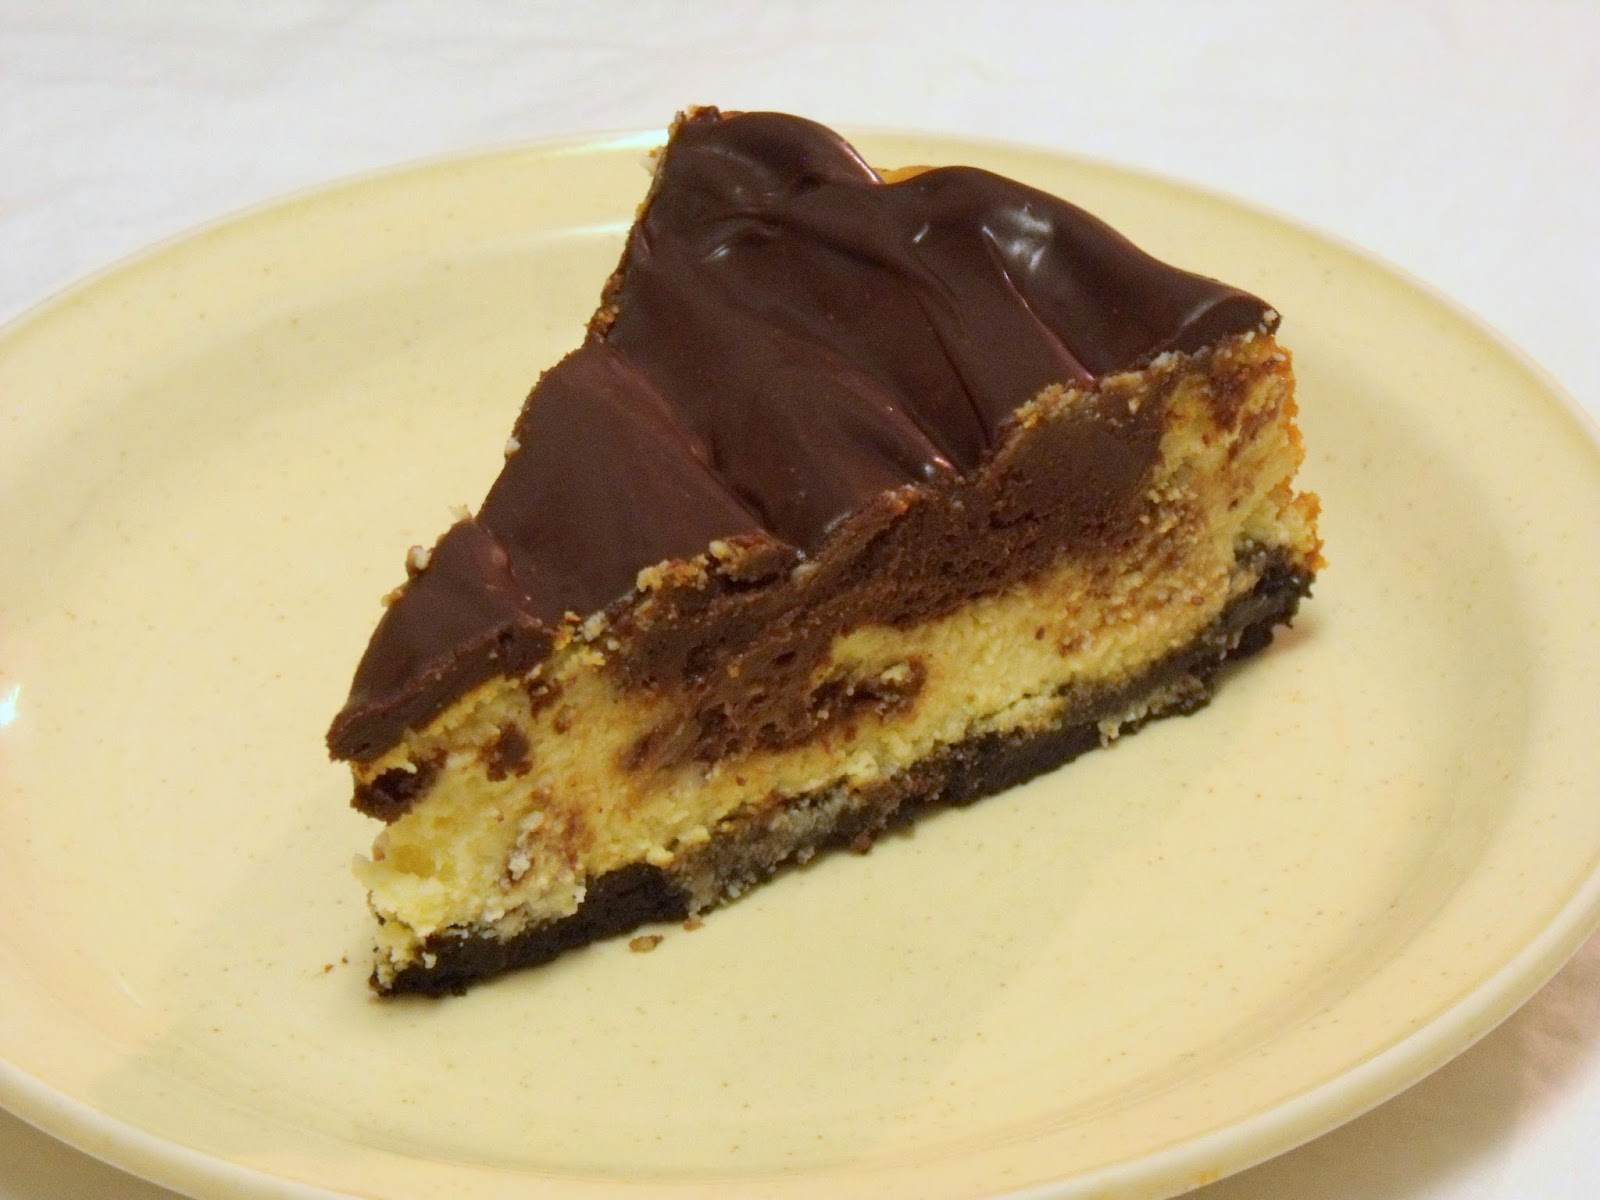
Rich, dense, chocolaty. The most intense cheesecake experience ever.

Linking:
Think Tank Thursday
One Project at a Time
Link Party Palooza
Strut Your Stuff Saturday

Friday, March 14, 2014

Layered Pumpkin Chiffon Pie

In honor of Pi Day (March 14 = 3/14 = 3.14), Jeff and I decided it would be criminal not to make some sort of pie. I know that pumpkin is more of an autumn thing, but it's what we had on hand and the recipe just looked so delicious.

This recipe came from an old (1978) Better Homes and Gardens recipe book, called "All-Time Favorite Pies." I love old recipe books, they're so much fun! Anyway, this layered chiffon pie has a mild pumpkin flavor that Jeff and I agreed would be wonderful as a Thanksgiving dessert. But being so light and fluffy, it wasn't at all too heavy for early spring. Just an all-around delightful pie.


Layered Pumpkin Chiffon Pie
Oil Pastry Crust
1 cup plus 2 tbsp. all-purpose flour
1/2 tsp. salt
1/4 cup oil
3 tbsp. cold milk
Chiffon Filling
1/2 cup sugar
1 envelope unflavored gelatin
1/2 tsp. salt
1/2 tsp. ground cinnamon
1/2 tsp. ground allspice
1/4 tsp. ground ginger
1/4 tsp. ground nutmeg
3 slightly beaten egg yolks
1 cup pumpkin puree, canned or cooked from fresh
1/2 cup milk
3 egg whites
1/4 cup sugar
Whipped Cream Filling
1 cup whipping cream
1/4 cup sifted powdered sugar
1/2 tsp. vanilla
1/4 tsp. ground cinnamon

Prepare crust: Stir together flour and salt. Pour oil and milk into small bowl (do not stir); add all at once to flour mixture. Stir lightly with a fork. Form into a ball; flatten slightly with hands.

Cut waxed paper into two 12-inch squares. Place ball of dough between 2 squares of paper. Roll dough into circle to edges of paper (Dampen tabletop with a little water to prevent paper from slipping). Peel off top paper and fit dough, paper side up, into pie plate. Remove paper.

Prick bottom and sides of pastry all over with a fork, to prevent the crust from puffin up. Line pastry shell with a double thickness of heady-duty foil; press down firmly but carefully. Bake pastry in preheated 450 degree oven for 5 minutes. Remove foil, continue baking 5 to 7 minutes more or until pastry is golden. Set pastry aside.

Prepare chiffon filling: In a saucepan combine the 1/3 cup sugar, gelatin, salt, the 1/2 tsp. cinnamon, allspice, ginger, and nutmeg. Combine egg yolks, pumpkin, and milk; stir into gelatin mixture in saucepan. Cook and stir over medium heat till gelatin dissolves and mixture thickens slightly. Remove from heat. Chill gelatin mixture to the consistency of corn syrup, stirring occasionally. (That's what the recipe says. But with the pumpkin, the consistency was never anywhere near corn syrup, it was too thick and gloppy. I just chilled it until it was noticeably thickened.)

Immediately beat egg whites till soft peaks form. Gradually add the 1/4 cup sugar, beating till stiff peaks form. Fold stiff-beaten egg whites into gelatin mixture. Set aside.

Prepare whipped cream filling: Combine whipping cream, powdered sugar, vanilla, and the 1/4 tsp. ground cinnamon. Whip mixture till soft peaks form.

Spread half of chiffon filling into baked crust, top with half of whipped cream filling. Repeat layers; chill several hours or overnight until set. After serving, cover and chill to store.


I know there's a lot of steps. But the finished product is so worth it. As a side note, I really liked this method of pie crust. No shortening to cut in, no floury mess on the table to roll it out. It turned out light and crispy, a great accompaniment to the airy fluffiness of the filling. Mmm, so yummy!

P.S. Here is the book where I got the recipe. Isn't it delightful?

Thursday, January 2, 2014

Coconut Cheesecake Tart


Sometime in November, my daughter asked me what I wanted for Christmas. She had taken it upon her sweet little 8-year-old self to write letters to Santa on behalf of everyone in the family. I thought about it and told her I would like a tart pan with a removable bottom. I had watched a cooking show where the host made pecan pie in a tart pan and was able to slice and serve the pie easily and beautifully. It looked like a great idea and something that I would actually use. So she wrote this letter to Santa: "Dear Santa, I was good today and I would like a tart pan with a removable bottom. Stephanie." So cute, right?

So I was pleased, but not surprised, to find this lovely fluted tart pan under the tree on Christmas morning.


And yesterday the kids and I mixed up this delicious tart, with a cookie pastry, a cream cheese and coconut filling, and a toasted coconut topping.


Coconut Cheesecake Tart
Tart:
1 1/4 cups flour
1/2 cup butter
2 tbsp. packed brown sugar
1 large egg
Filling:
2 cups shredded coconut
8 oz. cream cheese, room temperature
8 oz. whipped topping
1/3 cup sugar
1 tsp. vanilla

For the crust, preheat oven to 400 degrees. Combine crust ingredients until a dough is formed. Press onto bottom and about an inch up the sides of ungreased 9-inch fluted tart pan. Bake for 12 minutes.

While the crust is baking, spread coconut in a thin layer on a large baking sheet. Toast in the same oven as the crust, stirring every 3-4 minutes, until most of the coconut is golden brown. Set aside.

Once the crust and the coconut are cool, make the filling. Beat cream cheese until smooth, mix in sugar and vanilla. Add whipped topping and mix well. Stir in toasted coconut, reserving 1/2 cup for topping.

Spoon filling into crust, spread evenly. Sprinkle coconut evenly over filling. Remove sides from tart pan, then slide tart off the bottom of the tart pan onto serving dish. Chill until ready to serve.


I gotta say, slicing and serving this delicious tart was a dream! No digging around in the pie pan trying to fish out the first slice without tearing it apart. All I had to do was lift each slice right off the cake stand. It was a beautiful thing.

Linking:
Think Tank Thursday at Joyful Homemaking
Wowza Weekend Link Party at My Love 2 Create
Link Party Palooza at tatertots & jello
Strut Your Stuff Saturday Link Party at Sis Sisters' Stuff
Project Inspire{d} at An Extraordinary Day 

Tuesday, December 31, 2013

My Kitchen My World - Dessert

December's assignment on My Kitchen My World was a little different than usual. Normally we make a dish from a specific country each month. This month though, we could choose any holiday dessert from any country.

I chose to make a Jewish dish that is common in many European countries, called Noodle Kugel. It is a traditional dish for Sabbath and for festive holidays. This particular version is from Russia, I found it under the title of Russian Noodle Pudding.


Kugel isn't as sweet as I usually prefer for desserts. That's understandable considering that it's commonly used as a side dish as well as a dessert. It has a tartness from the cottage cheese and sour cream that melds nicely with the small amount of sugar and vanilla. My kids would definitely have enjoyed this more if it were topped with some maple syrup and whipped cream, but I actually liked it as is.


Noodle Kugel
16 oz. pasta, cooked and drained
24 oz. cottage cheese
2 cups sour cream
2 eggs
7 tbsp. sugar
1 tsp. vanilla
2 graham cracker sheets
2 tbsp. brown sugar
dash cinnamon
dash nutmeg
3 tbsp. butter

Heat oven to 350, butter a large baking dish.

Combine cottage cheese, sour cream, eggs, sugar, and vanilla. Mix well. Stir in pasta. Spread into buttered baking dish.

Crush graham crackers, add brown sugar and spices. Sprinkle over pasta mixture. Dot with butter.

Bake at 350 for 30 minutes. Serve warm or chilled.


I do wish I hadn't made such a large pan of this. It's yummy, but since the kids aren't huge fans I'm worried we might not eat it all fast enough. I wonder if it freezes well?


And here's an update on the kitchen. The last time I posted, it was an absolute mess of renovation horror. Well, here is what it looks like now. Much better! We're putting the renovation on hold for the winter, and will eventually put in the final touches like back splash, base boards, and the remaining cabinet doors in a few months. In the meantime, it's so nice to have it functioning and looking decent!


Linking:
Project Inspire{d} at Dukes and Duchesses
Think Tank Thursday at Joyful Homemaking
Wowza Weekend Link Party at My Love 2 Create
Link Party Palooza at tatertots & jello 
Strut Your Stuff Saturday Link Party at Six Sisters' Stuff

Friday, September 6, 2013

Creme de Menthe Brownies

Mint and chocolate - a match made in heaven. Jeff bought some creme de menthe baking chips recently, just for fun. They're basically chopped up Andes bars. Both of us knew right away that they would be delicious baked into some rich, chocolatey brownies.

Andes and brownies, you can't go wrong.


Creme de Menthe Brownies
(adapted from Hershey's)
4 eggs
1 1/4 cups sugar
1/2 cup (1 stick) butter or margarine, melted
2 tsp. vanilla
1 1/3 cup flour
2/3 cup cocoa powder
1 tsp. baking powder
1/2 tsp. salt
1 1/2 cup Andes Creme de Menthe baking chips

Heat oven to 350. Grease 9x13 pan.

Beat eggs in large bowl until foamy; gradually beat in sugar. Add butter and vanilla; beat until blended. Stir together flour, cocoa, baking powder, and salt; add to egg mixture, beating until blended. Stir in baking chips. Spread batter into prepared pan.

Bake 25 to 30 minutes or until brownies begin to pull away from sides of pan. Cool completely in pan on wire rack. Cut into squares.


Linking to: Link Party Palooza at tatertots & jello
Project Inspire{d} at Dukes and Duchesses 
Think Tank Thursday at Joyful Homemaking

Tuesday, June 18, 2013

Lemon Bar Muddy Buddies

I normally post my Iron Craft projects on my other blog, Pursuit of Craft. But this one is a recipe, so here it is!

The Iron Craft challenge was to create something to do with picnics. I recently found a recipe for Lemon Bar Muddy Buddies, which got me so excited. They taste like lemon bars, but in the form of fun little bite-sized snacks. Toss a batch of these in a lunch basket with some sandwiches and water bottles and you've got the makings of a great picnic!


Lemon Bar Muddy Buddies
(from Lemon Tree Dwelling)
8 c. Rice Chex cereal (generic works fine!) 
1 c. white chocolate chips 
1/2 c. lemon curd 
1/4 c. butter 
1 1/2 c. powdered sugar

Melt white chocolate chips and butter in a small saucepan over medium heat, stirring constantly. (The melting won't be smooth - don't worry!)

Once melted, remove from heat and stir in lemon curd until smooth. Pour Rice Chex into a large paper bag (grocery size) and pour lemon mixture over cereal. Fold the bag to seal and shake to coat cereal. 

Add powdered sugar to paper bag and shake once more to coat.

Spread out on cookie sheet to cool; once completely cool, store at room temperature in airtight containers.


Yummy!

Linking to:
Think Tank Thursday at Joyful Homemaking
Weekend Wrap-Up Party at tatertots & jello